The Danalock V3 smart lock can be installed by anyone since installation is very easy and quick. An average user can mount Danalock V3 within 10-15 minutes.
Follow the instructions for mounting your Danalock V3 on EURO cylinder below, watch the video or print instructions in PDF.
Here you can find the instructions for integration the Danalock V3 with Airbnb platform.
Instructions for mounting Danalock V3 on other cylinder types you can find here: Scandi, Assa 2000, US.
Before mounting
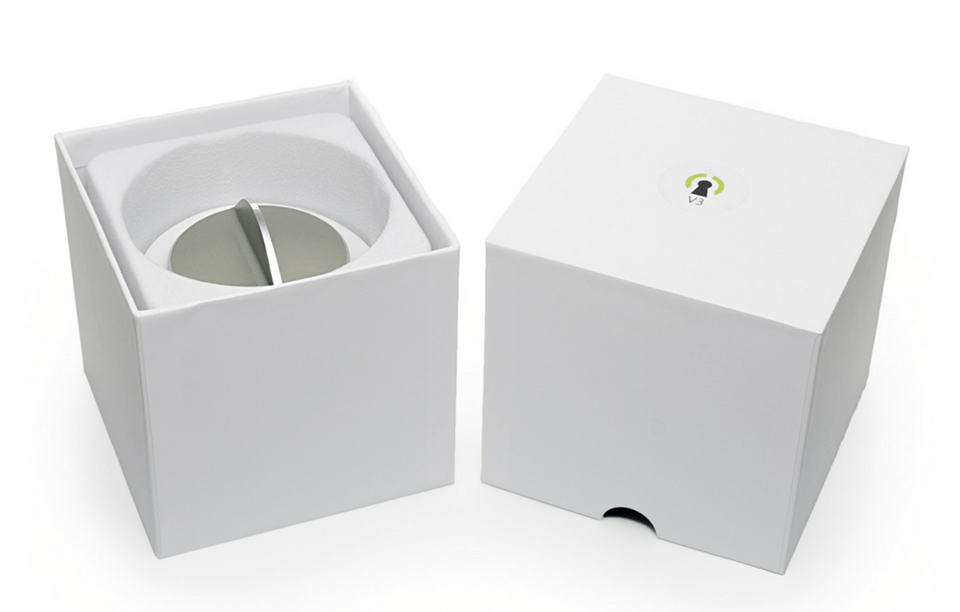
Contents of the Danalock and Cylinder Box
On the picture you can see all the contents that you will find in your Danalock box and you need for the easy install.

To mount the Danalock V3 you will need
- Philips screwdriver
- Two sets of pliers or a wire cutter

Parts involved on your existing lock
For easier understanding, you can see on the picture what are the parts that are involved on your existing lock.

Video mounting guide for Danalock V3 Euro
Danalock installation guide

1. Remove the old cylinder
Unscrew the lock screw in the mortise plate on the side of the door.

2. Pull out the old cylinder
Insert your key and turn it so the cam lines up with the body of the cylinder. Then it will be easy to pull out of the hole in the rosette.

3. Adjust the new cylinder
Measure the back part (on the outside of your door) of the old cylinder from the middle of the screwhole and away (see illustration).
In the Danalock box you’ll find an adjustable lock cylinder.

4. Unscrew the small screws
Just unscrew the small screws on both sides of the part you want to remove, and pull the cylinder apart.

5. Insert new brass tube and spacer piece
Remove too big spacer piece and brass tube- Insert the same size of spacer piece and brass tube to make the adjustable cylinder match the old cylinder. Please look at the size guide below to find the right length for the spacer piece and brass tube.

6. Size guide
When you adjust the size of the Danalock cylinder to the old cylinder you’ll have to exchange the brass tube in the center with another that fits the spacer piece. Here are the different combinations.

7. Assemble the cylinder
Assemble the cylinder and screw the tiny screws back in on both sides of the cylinder.

8. Insert the adjustable cylinder
Insert the new cylinder, and re-insert the lock-screw in the mortise plate to fix the cylinder. Do not over-tighten the screw and make sure the cylinder is working by locking and unlocking with your hand.

9. The right Rosette spacer
To avoid pulling the cylinder out of place you need to find the right spacer between the rosette and the new cylinder. Unscrew the two breakable screws that holds the spacers together to the adjustable cylinder, and choose the spacer with the same or larger thickness than the gap between the cylinder and the rosette surface.

IMPORTANT!
Avoid pulling the cylinder out of place! It is important that the spacer flushes or protrudes from the hole in the rosette plate!!


10. Break the screws the right length
Depending on which spacer or spacer combination you chose, it is now important that the screws that fasten the cylinder to the back plate have the right length. Use this chart to find the right length.
Use a wire cutter, two pliers or bend the screws forth and back several times in a vice to break them.

11. Fasten the back plate to the cylinder
Fasten the back plate to the cylinder with the rosette spacer in between them.

IMPORTANT!
Check that the lock still works! Make sure that the lock still works properly by turning the tailpiece. If you can’t lock and unlock this way please loosen the cylinder screws.

12. Ensure that the tailpiece the right length
To avoid damaging the Danalock, you must shorten the new cylinder tailpiece to a maximum of 35 mm from the door surface. Use two sets of pliers or a wire cutter to shorten the tailpiece.

13. Attach the tailpiece adaptor
Insert the green tailpiece adaptor in the center tube on the backside of the Danalock.
Press on the adaptor until a click ensures it is fixed firmly to the Danalock.

14. Fit the tailpiece to the middle of the housing base
Fit the Danalock over the back plate. Make sure the tailpiece hits the slide in the middle of the adaptor.

15. Align the plate marks
Find the small mark on the edge of the back plate and align it with the small mark on the back of the Danalock baseplate to ensure that the notches on the back plate line up.

16. Fasten the Danalock
Turn the Danalock clockwise until it clicks to fasten it to the back plate.
NOTE:
If you need to unfasten and retry, see “Uninstall instructions” at the end of the manual.

17. Activate batteries
Pull out the plastic tab to activate the batteries. A light will flash to confirm the Danalock is ready.
NOTE!
If you remove the batteries, you will need to re-calibrate the Danalock lock.

18. Before downloading the Danalock app: Do not close door
Your Danalock is now installed. Download and open the Danalock app to complete setup.
NOTE!
Leave the door open during app setup for smoother calibration.

19. Download the Danalock App
Go to Google Play or App Store and download the Danalock app.
Once the app is installed, create a user profile by selecting the blue arrow- ring. You will use this profile to sign in going forward. To sign in, enter your username and password and select the green arrow – ring.

20. Add the lock in the app
Select “Menu” at the bottom left, and then “New device”.
A guide will now lead you through the installation and configuration of your Danalock.

Dismount instructions
To dismount the Danalock from your door, insert a pen tip into the hole at the top inner edge of the lock. Press while turning the lock counter-clockwise until the lock releases.
Dismounting will not reset the lock or disconnect it from your account, but the lock may need to be re-calibrated when reinstalled.
IMPORTANT!
If you want to delete Danalock from your app you have to be next to your Danalock – in Bluetooth range of your Danalock!


